Using Moesif with Middy and Serverless for AWS Apps
See the GitHub repository for the source code of this article’s example project.
Serverless is a popular framework to build serverless apps using AWS Lambda on the Node.js runtime. Serverless automatically orchestrates necessary resources on AWS and can scaffold a basic project for you that you can build up on. You can solely focus on your application’s core logic, development, and your Lambda functions.
But your Lambda functions can get complex and hard to work on as your project grows. You may need to separate concerns in an idiomatic and consistent way. Otherwise, your Lambda functions can lose their clarity and conciseness. It becomes harder to maintain the different pieces of logic. That’s where Middy comes in with its middleware engine.
And lastly, you want a robust and industry-tested tool to analyze and monitor your AWS apps. Moesif gives you a comprehensive Cloud platform for not only API observability and monitoring, but also monetization.
In this blog post, you’ll build a simple Node.js app using Moesif, Middy, and Serverless. In just a few lines of code, you’ll have the basics in your belt for building serverless apps that Moesif can analyze, monitor, and lets you monetize on.

Table of Contents
- Objectives
- Prerequisites
- Sign up for Moesif
- Get your Moesif Application ID
- Create an AWS Account
- Install Serverless
- Bootstrap the Project using Serverless
- Build the Application
- Wrapping Up
- Next Steps
Objectives
At the end of this tutorial blog post, you’ll accomplish the following objectives:
- Use Moesif AWS Lambda Middleware for Node.js to capture API calls to AWS Lambda applications.
- Use Middy to compose and stich together multiple middlewares.
- Use Serverless to set up, configure, and deploy your application to AWS.
Prerequisites
Before you proceed, make sure have Node.js 20 or greater installed on your system.
Sign up for Moesif
You must have an active Moesif account to connect your Lambda application with Moesif. So if you haven’t already, sign up for Moesif. Otherwise, log into your Moesif Portal.
Get your Moesif Application ID
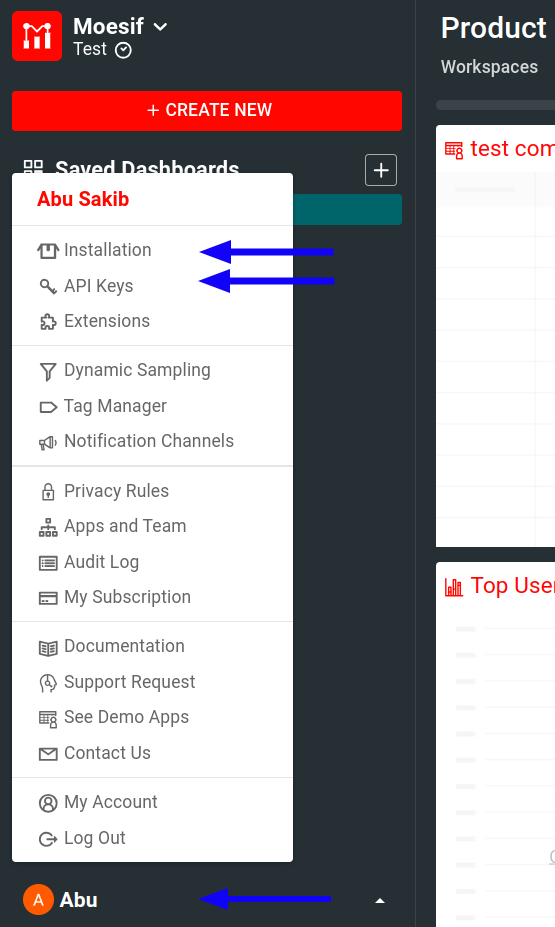
You can get your Application ID during the onboarding process when you sign up for Moesif. Otherwise, you can get your Application ID any time by following these steps after you log into Moesif Portal:
- Select the account icon to bring up the settings menu.
- Select Installation or API Keys.
- Copy your Moesif Application ID from the Collector Application ID field.
Create an AWS Account
Serverless framework deploys your application to AWS. So you need an AWS account as well. Later, you will set up Serverless with your AWS credentials so Serverless knows where to deploy and orchestrate the necessary resources. So go to the AWS sign up page or log into your account.
Install Serverless
Follow these instructions to install Serverless on your machine.
This makes a global serverless command available that you can use to deploy and manage your application in AWS, right from your command line! Later, you’ll use this command to initialize, set up, and deploy your Lambda function to AWS.
Bootstrap the Project using Serverless
Now let’s start bootstrapping the project with Serverless.
Execute the serverless command in a directory of your choice:
serverless
This command walks you through some steps to complete the bootstrapping process:
- Select
AWS / Node.js / HTTP APIas the Template. This Template defines the Service Serverless creates. - Then specify a name for the Service. Serverless creates a folder with the name you specify here and puts all your project files inside that folder.
- Serverless now prompts you to log into Serverless or register. Go to Serverless Dashboard to log in or register.
Connect a Provider
Serverless needs to connect to a serverless infrastructure provider with appropriate credentials to deploy your project. We recommend performing this step from the Serverless Dashboard for your organization. So follow the instructions in What is Serverless Dashboard to connect AWS with Serverless and proceed to the next step.
Create an App and Finish the Bootstrapping Process
After you’ve performed the preceeding steps, serverless command now asks you to
choose from an existing App to associate with the Service you created earlier.
For this example, create a new App and then specify a name for the App.
The bootstrapping process finishes. You can see a new directory containing
your Lambda handler function and the Serverless configuration
file serverless.yml. The directory structure looks similar to the following:
moesif-middy-serverless-demo/
├── handler.js
├── README.md
└── serverless.yml
Here, we’ve named the Service moesif-middy-serverless-demo. The handler.js
and serverless.yml files contain the Lambda function and Serverless configuration
respectively. We’ll modify both of them in the next sections to fit our needs.
Build the Application
We have scaffolded a Serverless Service for a Node.js application that uses Amazon API Gateway HTTP API. We also have a Provider ready where Serverless can deploy our app to and manage it. To make the application ready to deploy, the rest of the steps to make consist of the following:
- Installing the dependencies.
- Writing the Lambda function.
- Configuring the deployment.
Install the Dependencies
Let’s briefly go through the main dependencies we’re going to use in this example. Before proceeding, let’s initialize the service directory with an NPM project:
npm init
If you want to install all the dependencies at once, see the example’s
package.json file on GitHub
.
Moesif AWS Lambda middleware for Node.js
This middleware will capture API calls to your API and send them to Moesif for analytics and monitoring. You can install it with the following command:
npm install --save moesif-aws-lambda
Middy and Middy Middlewares
Install Middy with the following command:
npm install --save @middy/core
Then install the following middlewares:
npm install --save @middy/http-error-handler \
@middy/http-json-body-parser \
@middy/http-security-headers \
@middy/validator
Middy defines a specific set of rules to write AWS middlewares. Then it becomes very easy to plug in those middlewares to your application using Middy.
You’re using Moesif for API analytics and monitoring. When you use several middlewares to achieve or perform specific tasks, you may want Moesif to capture those activities as well. For that reason, when we write the Lambda function, we plug in Moesif’s middleware in a way that allows Moesif to get full visibility into your API. It doesn’t matter how many other middlewares you use.
Dotenv
Lastly, install the dotenv NPM package to manage environment variables:
npm install --save dotenv
Write The Lambda Function
For this example, we use this simple Lambda handler function:
import moesif from "moesif-aws-lambda";
import middy from "@middy/core";
import httpSecurityHeaders from "@middy/http-security-headers";
import validator from "@middy/validator";
import { transpileSchema } from "@middy/validator/transpile";
import jsonBodyParser from "@middy/http-json-body-parser";

import "dotenv/config";
import httpErrorHandler from "@middy/http-error-handler";

const moesifOptions = {
  application_id: process.env.MOESIF_APPLICATION_ID,
  logBody: true,
};

const greetingsHandler = async (event, context) => {
  const { greetingsMessage, greeterName } = event.body;

  const response = {
    statusCode: 200,
    body: JSON.stringify({
      message: "Greetings details received successfully!",
      greetingsDetails: {
        greetingsMessage: greetingsMessage,
        greeter: greeterName,
      },
    }),
    headers: {
      "Content-Type": "application/json",
    },
  };
  return response;
};

const schema = {
  type: "object",
  properties: {
    body: {
      type: "object",
      properties: {
        greetingsMessage: {
          type: "string",
        },
        greeterName: {
          type: "string",
        },
      },
      required: ["greetingsMessage", "greeterName"],
    },
  },
};

// Wrap the final handler from Middy with `moesif`.
export const lambdaHandler = moesif(
  moesifOptions,
  middy()
    .use(httpSecurityHeaders())
    .use(jsonBodyParser())
    .use(validator({ eventSchema: transpileSchema(schema) }))
    .use(httpErrorHandler())
    .handler(greetingsHandler)
);
Put this Lambda function code in the handler.js file inside your Service directory.
Notice the following details about this Lambda function:
- We set some configuration options
for the middleware. We also use the
dotenvpackage to retrieve the environment variable holding the Moesif Application ID. - Then we define our handler function
greetingsHandler.- We extract the
greetingsMessageandgreeterNamevalues from the body. - We define the structure of the request payload in
schema. Thevalidatormiddleware validates the request playload against this schema. For more information about the schema syntax and the validation, see thevalidatormiddleware documentation - Since we know what a valid request body contains, we extract the values we expect from the
eventobject. Notice how the Lambda function remains clean and readable because we push concerns like validation and parsing into separate middlewares. - We specify the Lambda response.
- Lastly, we stitch together all the middlewares. Here, make sure that you wrap the final Middyfied handler with Moesif middleware. You must also parse the body first and then call the validation middleware. See the order in which Middy executes middlewares for more information.
- We extract the
Let’s briefly look at the middlewares the Lambda function uses and what they do:
http-security-headers- Adds best practice security headers to the Lambda response.
http-json-body-parser- Parses HTTP requests with a valid JSON payload and converts them into an object. As mentioned before, you must call this
middleware before you call the validation middleware
validator. validator- Validates the incoming
request.eventevents of the Lambda handler. http-error-handler- Handles any errors that may have gone unhandled and composes an appropriate HTTP response from them.
Configure the serverless.yml File
First, let’s look at the
serverless.yml file Serverless generated in the service directory. It looks
similar to the following:
# "org" ensures this Service is used with the correct Serverless Framework Access Key.
org: moesif
# "app" enables Serverless Framework Dashboard features and sharing them with other Services.
app: moesif-middy-serverless-node
# "service" is the name of this project. This will also be added to your AWS resource names.
service: moesif-middy-serverless-demo

provider:
  name: aws
  runtime: nodejs20.x

functions:
  hello:
    handler: handler.hello
    events:
      - httpApi:
          path: /
          method: get
You can see the
full serverless.yml reference documentation
to understand what each of the properties mean. But for our example project,
let’s focus on the
functions property
that specifies the configuration of your Lambda functions. In this case, it defines
these specifics:
- The Lambda function name
hello. - The file and module for the
hellofunction. - The Lambda events that trigger this function. Here, it specifies
a API Gateway v2 HTTP API that triggers this Lambda whenever
the API receives a
GETHTTP request to the root path.
So let’s modify the functions property like the following according to our use
case:
functions:
  greetingsHandler:
    handler: handler.lambdaHandler
    events:
      - httpApi:
          path: /
          method: post
Specify Environment Variables
Specify your Moesif Application ID in a .env file like this inside the Service directory:
MOESIF_APPLICATION_ID=YOUR_MOESIF_APPLICATION_ID
Deploy
Finally, deploy your Lambda with the following command:
serverless deploy
After the deployment finishes successfully, your command line shows an output similar to the following:
Deploying "moesif-middy-serverless-demo" to stage "dev" (us-east-1)

✔ Service deployed to stack moesif-middy-serverless-demo-dev (104s)

endpoint: POST - https://******.execute-api.us-east-1.amazonaws.com/
functions:
  greetingsHandler: moesif-middy-serverless-demo-dev-greetingsHandler (3.8 MB)
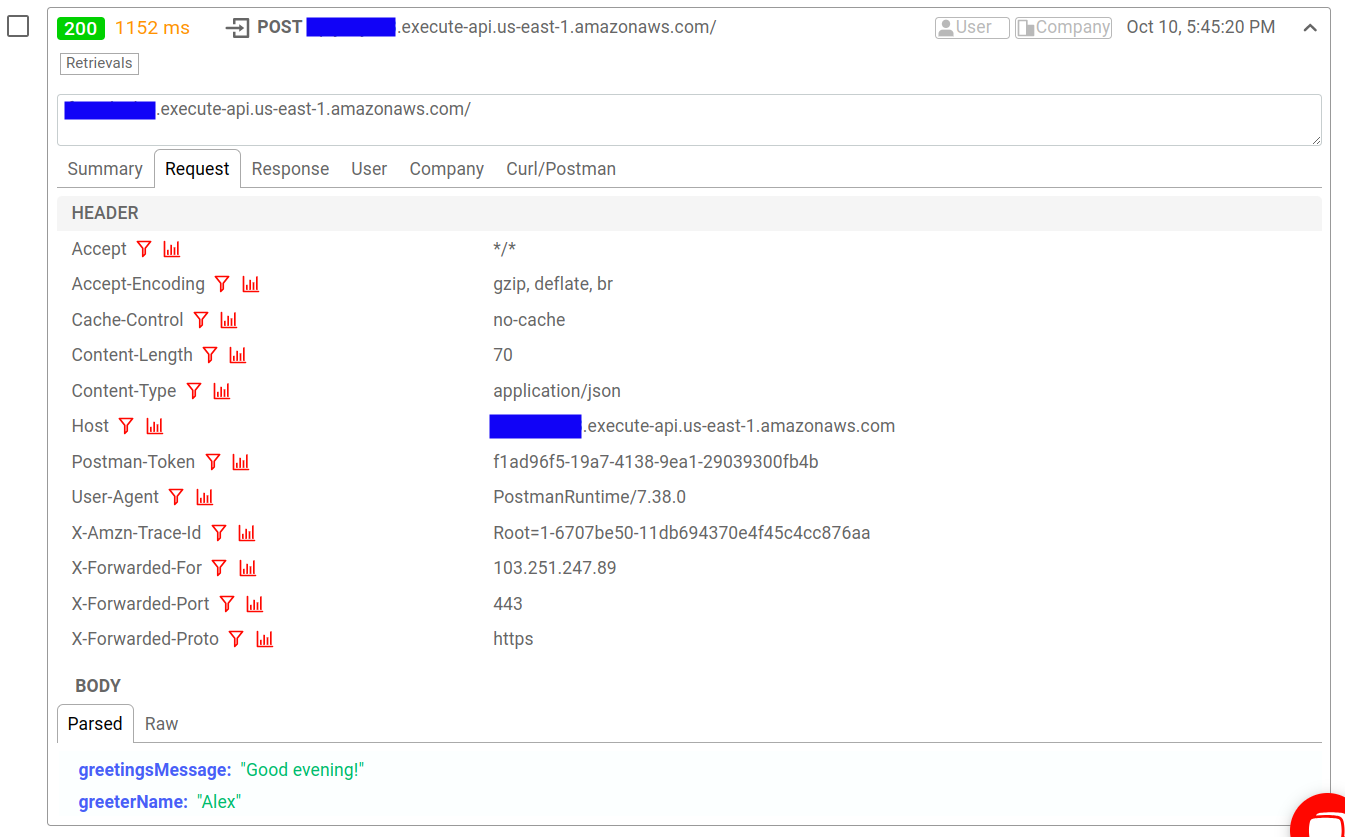
Now you can start sending HTTP POST requests to the endpoint with the
following body structure:
{
  "greetingsMessage": "Good evening!",
  "greeterName": "Alex"
}
Your API should return back a successful response in the following format:
{
  "message": "Greetings details received successfully!",
  "greetingsDetails": {
    "greetingsMessage": "Good evening!",
    "greeter": "Alex"
  }
}
And in a Live Event log in your Moesif Portal, you should see your API calls appear.
Remember that we have a validation middleware in place.
So if your request body doesn’t follow the schema, the server sends back
a 400 Bad Request HTTP status code with the message Event object failed validation.
Wrapping Up
This article demonstrates how you can easily integrate Moesif into your AWS apps built with Middy and Serverless. Think about how Middy and Serverless Framework makes building AWS Lambda applications more manageable and less comlex. If you pair that with Moesif, you have access to powerful analytics and monitoring tools that can help you understand your users better and make critical decisions to grow your product. Moesif’s robust monetization features seamlessly integrate with your favorite billing providers like Stripe.
Illustrating how Moesif can help you unlock the full power of serverless cloud applications is beyond the scope of this article. But you can sign up today for a free trial without any credit cards to try Moesif out for yourself hassle-free.
Next Steps
- Explore integration options from Moesif:
- Troubleshoot common server integration issues
- Explore API analytics documentation
- Build an AWS Lambda REST API with Express.js
- Build an AWS Lambda GraphQL API with Apollo GraphQL
- Build and monetize an AI API using Moesif, AWS, and Stripe


Related Articles

API Strategy
Leveraging AI For a Better API Strategy
Learn how to leverage AI to build and fortify your API strategy. Improve design, governance, documentation, and align APIs with business outcomes.
API Strategy
The 5 Best Mixpanel Alternatives of 2025
Learn about the best Mixpanel alternatives to determine the right analytics solution for your use case.

API Development
How to Leverage Moesif Effectively for API Observability
Effectively leverage Moesif for API observability through best practices for integration, event enrichment, custom actions, and engineering workflow integrat...
API Strategy
How to Build an Internal Chargeback Model for Your API and AI Usage Using Moesif
Use Moesif to implement internal chargebacks and enable precise API and AI cost attribution for better transparency and resource optimization.