How to Build an API With Python Flask

Python Flask is a popular framework for building web applications and APIs in Python. It provides developers with a quick and easy way to create RESTful APIs that can be used by other software applications. Flask is lightweight and requires minimal setup, making it a great choice for building small to medium-sized APIs. This makes Flask an ideal choice for developers looking to build robust and scalable APIs in Python. This example will review how to create a simple rest API Flask tutorial.

Prerequisites
Before we start, we must ensure that a couple of prerequisites are completed. To follow along and run this tutorial, you will need to:
- Install Python
- Have an IDE to edit your code
- Install Postman so that you can test the endpoint
After all 3 of these prerequisites are completed, we can begin!
Creating the Base Project
To create the base project, the first thing we will do is create a folder named python-flask-api in your chosen directory.
With the new folder created, we will open a terminal in the root of the folder so that commands can be executed to build and run our Python project. Once your terminal is pointed to the root directory of your project, run the following commands so you can initialize the Python Rest API Flask project and manage the dependencies.
First, we will use pip to install Flask in the project directory. To do this, run the command below.
pip install Flask
Writing the Code
In our first line of code in the app.py file, we will import the modules for json, Flask, jsonify, and request.
import json
from flask import Flask, jsonify, request
Next, we will create a new Flask application by adding the following code just below our import statements.
app = Flask(__name__)
Next, to give our API a little bit of data to work with, we will define an array of employee objects with an ID and name.
employees = [ { 'id': 1, 'name': 'Ashley' }, { 'id': 2, 'name': 'Kate' }, { 'id': 3, 'name': 'Joe' }]
To define our API endpoint, we will now add code to define a route for GET requests to the ‘/employees’ endpoint. This will return all employees (from our employees array defined above) in JSON format.
@app.route('/employees', methods=['GET'])
def get_employees():
 return jsonify(employees)
On top of our GET method, we will also define a route for POST, PUT, and DELETE methods as well. These functions can be used to create a new employee and update or delete the employee based on their given ID.
@app.route('/employees', methods=['POST'])
def create_employee():
 global nextEmployeeId
 employee = json.loads(request.data)
 if not employee_is_valid(employee):
   return jsonify({ 'error': 'Invalid employee properties.' }), 400

 employee['id'] = nextEmployeeId
 nextEmployeeId += 1
 employees.append(employee)

 return '', 201, { 'location': f'/employees/{employee["id"]}' }

@app.route('/employees/<int:id>', methods=['PUT'])
def update_employee(id: int):
 employee = get_employee(id)
 if employee is None:
   return jsonify({ 'error': 'Employee does not exist.' }), 404

 updated_employee = json.loads(request.data)
 if not employee_is_valid(updated_employee):
   return jsonify({ 'error': 'Invalid employee properties.' }), 400

 employee.update(updated_employee)

 return jsonify(employee)

@app.route('/employees/<int:id>', methods=['DELETE'])
def delete_employee(id: int):
 global employees
 employee = get_employee(id)
 if employee is None:
   return jsonify({ 'error': 'Employee does not exist.' }), 404

 employees = [e for e in employees if e['id'] != id]
 return jsonify(employee), 200
Once our code is complete, it should look like this:
import json
from flask import Flask, jsonify, request
app = Flask(__name__)

employees = [
 { 'id': 1, 'name': 'Ashley' },
 { 'id': 2, 'name': 'Kate' },
 { 'id': 3, 'name': 'Joe' }
]


nextEmployeeId = 4
3
@app.route('/employees', methods=['GET'])
def get_employees():
 return jsonify(employees)

@app.route('/employees/<int:id>', methods=['GET'])
def get_employee_by_id(id: int):
 employee = get_employee(id)
 if employee is None:
   return jsonify({ 'error': 'Employee does not exist'}), 404
 return jsonify(employee)

def get_employee(id):
 return next((e for e in employees if e['id'] == id), None)

def employee_is_valid(employee):
 for key in employee.keys():
   if key != 'name':
 	return False
 return True

@app.route('/employees', methods=['POST'])
def create_employee():
 global nextEmployeeId
 employee = json.loads(request.data)
 if not employee_is_valid(employee):
   return jsonify({ 'error': 'Invalid employee properties.' }), 400

 employee['id'] = nextEmployeeId
 nextEmployeeId += 1
 employees.append(employee)

 return '', 201, { 'location': f'/employees/{employee["id"]}' }

@app.route('/employees/<int:id>', methods=['PUT'])
def update_employee(id: int):
 employee = get_employee(id)
 if employee is None:
   return jsonify({ 'error': 'Employee does not exist.' }), 404

 updated_employee = json.loads(request.data)
 if not employee_is_valid(updated_employee):
   return jsonify({ 'error': 'Invalid employee properties.' }), 400

 employee.update(updated_employee)

 return jsonify(employee)

@app.route('/employees/<int:id>', methods=['DELETE'])
def delete_employee(id: int):
 global employees
 employee = get_employee(id)
 if employee is None:
   return jsonify({ 'error': 'Employee does not exist.' }), 404

 employees = [e for e in employees if e['id'] != id]
 return jsonify(employee), 200

if __name__ == '__main__':
   app.run(port=5000)
Lastly, we will add a line of code to run our Flask app. As you can see, we call the run method and get the Flask app running on port 5000.
if __name__ == '__main__':
   app.run(port=5000)
Running and Testing The Code
With our code written and saved, we can start the app up. To run the app, in the terminal we will execute the follow pip command.
pip api.py
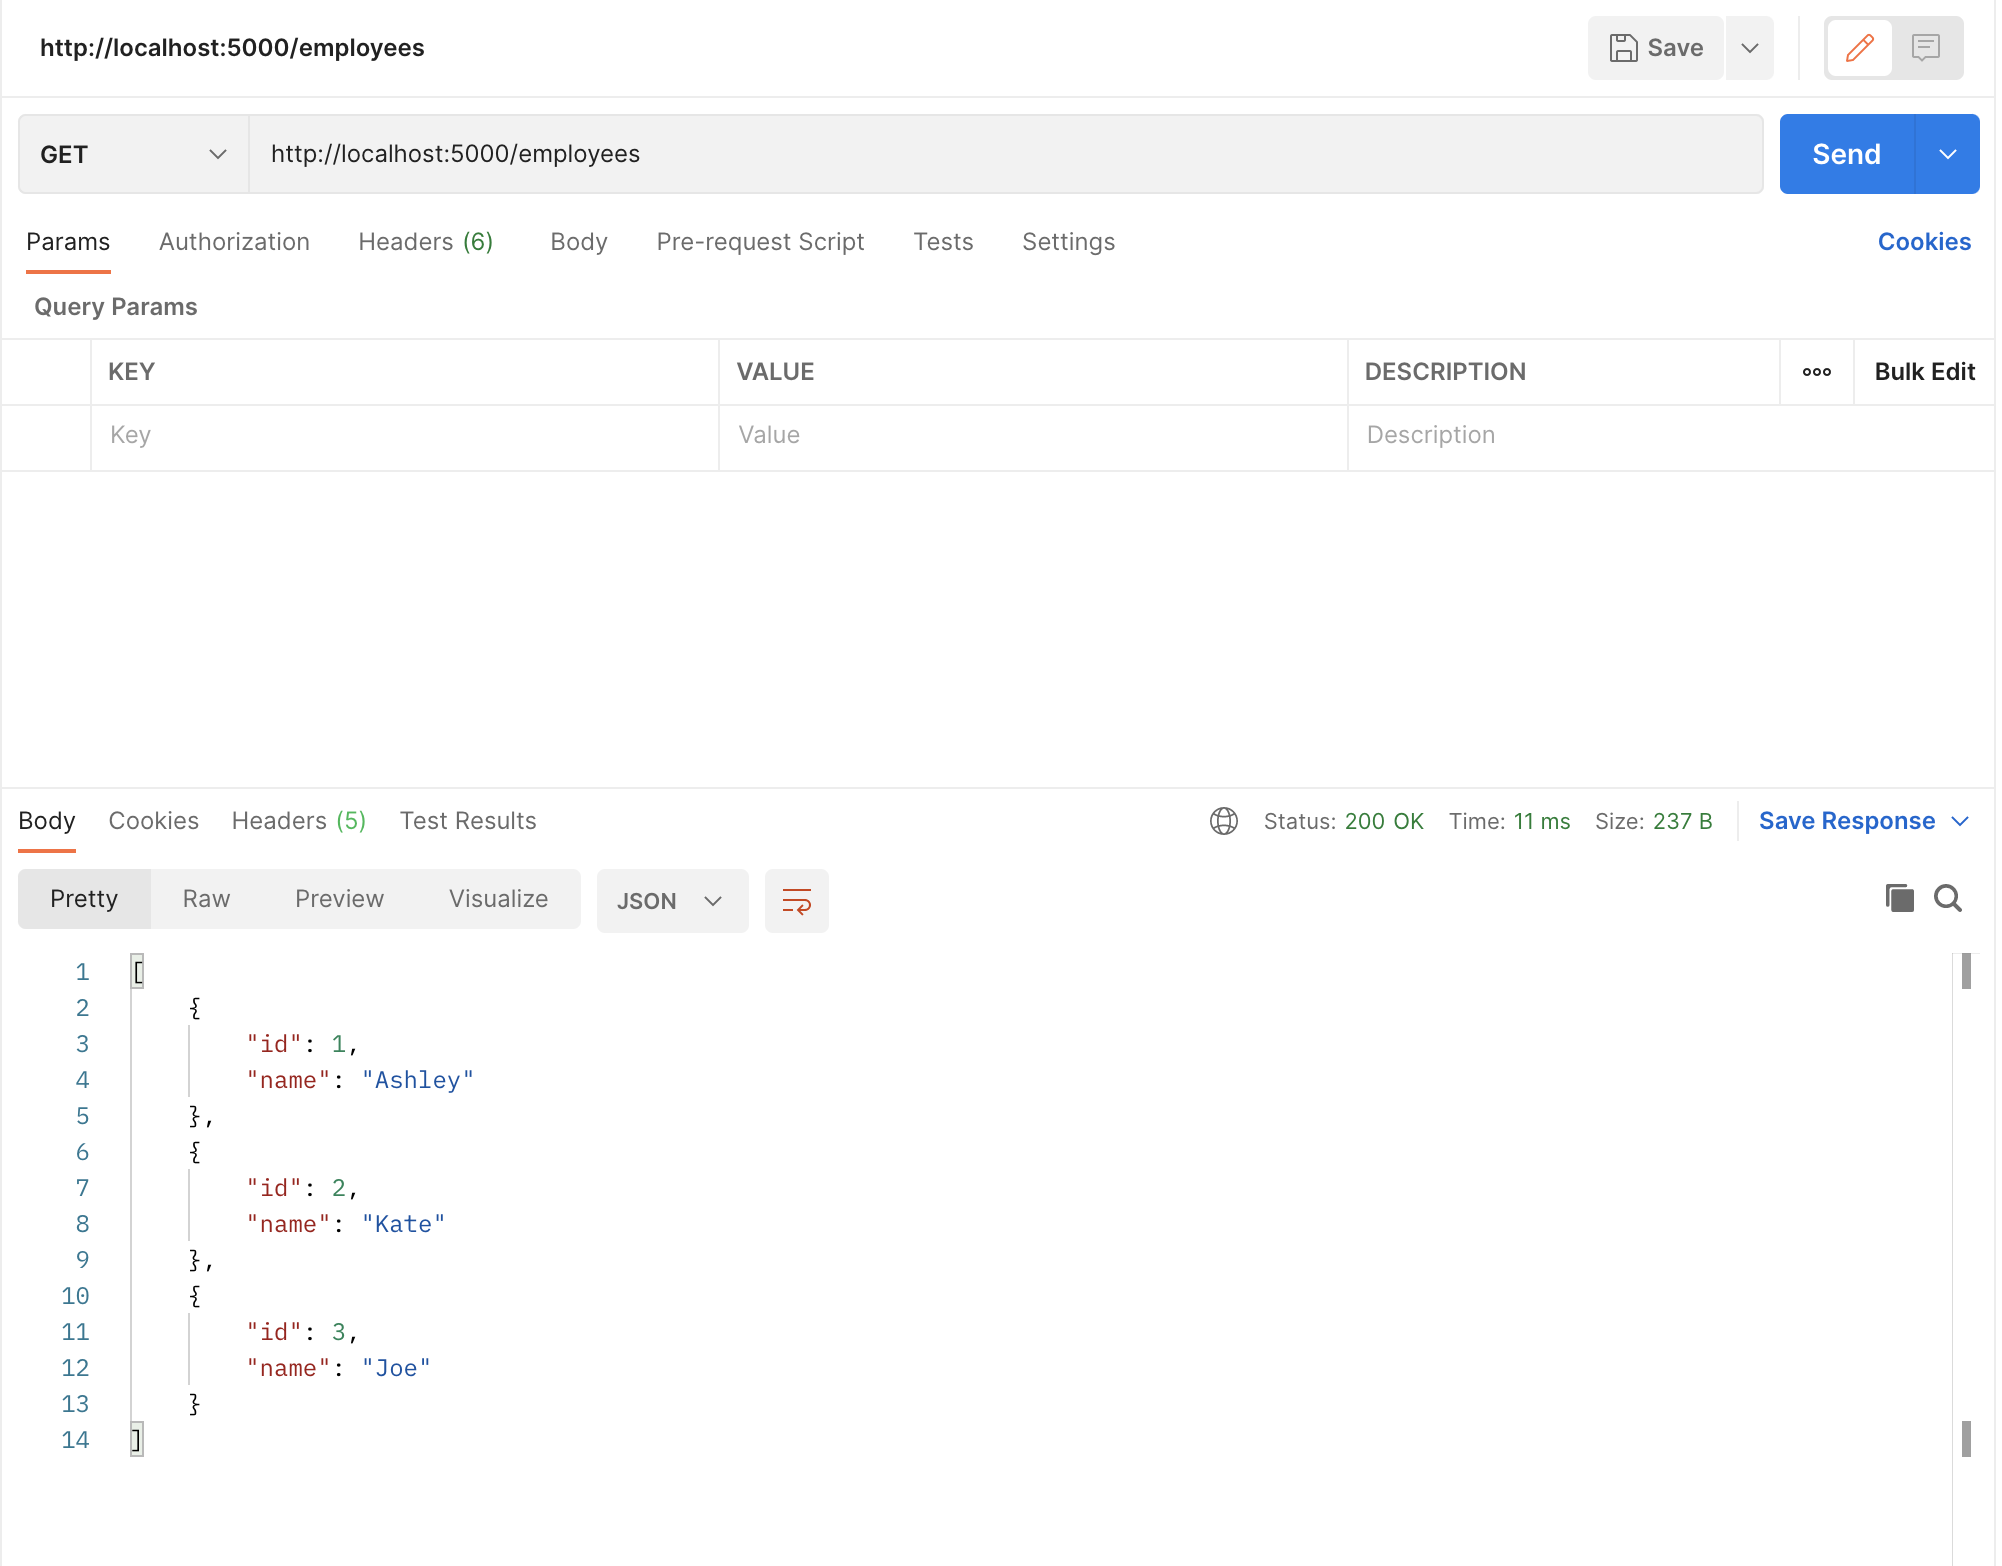
Now, our API is up and running. You can send a test HTTP request through Postman. By sending a request to localhost:5000/employees. After the request is sent. you should see a 200 OK status code in the response along with an array of employees returned.
For this test, no request body is needed for the incoming request.
Wrapping Up
With that, we’ve created a simple RESTful API Flask using Python. This code can then be expanded on as needed to build APIs for your applications. Moving forward, you may want to secure the API with an API key, integrate the API with an API gateway, check out how your API is being consumed and used, or build revenue through API monetization? For a solution to your API analytics and monetization needs, check out Moesiftoday to explore all of this and more!


